 BuildingHQ
One login. Room to grow.
Join your landlord for free, then use the same login for your own property business. Learn what is included, when a plan is needed and how to keep accounts separate.
Understand your login and accounts
Your email and password identify you. Each account keeps its own properties, records and permissions. Property accounts belonging to the same business can share a paid plan when their owner links them. An invitation to your landlord’s account gives you tenant access, not ownership or access to other tenants’ records.
Landlords: invite a tenant
Add the building, unit and renter, then create an active lease linking them. Open Landlord → Renters, choose the renter profile and enter their email under Invite tenant by email. Send the invitation; sending again resends it. Use the tenant’s own email. Archived renters cannot be invited.
Tenants: accept your invitation
Open the invitation email. If you are new, follow the link to set your own password. If you already use BuildingHQ, sign in with your existing email and password. Choose the landlord’s account if prompted. Your invited tenant portal is free: no card or separate subscription is required. Before entering an invited account, review and accept BuildingHQ’s terms and any house rules your landlord has added when prompted.
Report rent and stay in touch
Open your tenant portal, check the unit and lease, and report your payment with its amount, date, method and reference. Attach receipt evidence if available. The landlord reviews the report before recording it as received. A submitted receipt does not itself move money. Use building conversations to contact management and report maintenance needs through the portal.
Run the day from the dashboard
The landlord dashboard combines portfolio totals, occupancy, monthly income trends, outstanding balances, expiring leases, maintenance, tasks and recent payments. Start with exceptions, open the underlying record, and use the quick actions for buildings, renters, payments and maintenance.
Move a vacancy into a lease
Create a vacancy listing with availability, rent, amenities and media. Share the public listing, track prospects and tours, review applications and screening references, then prepare signatures and convert the approved application into the renter, unit and lease without entering the same information again.
Coordinate building operations
Use resident operations for parcels, visitors and guest passes, parking permits, keys and fobs, incidents, renovation requests, household records, amenities, events, surveys and the building library. Permissions are assigned by building, and every handoff keeps its history.
Install the mobile app
Choose Install app from the user menu in a supported browser. Allow notifications when prompted to receive account alerts. Inspection drafts, photos, readings and signatures are kept on the device when the connection drops and synchronize after you reconnect.
Use AI assistance carefully
Accounts with AI access can ask questions in their own language. Authorized staff can receive answers grounded in a limited current workspace snapshot, while residents can ask about published building documents. Check the cited records and complete important changes in the normal audited workflow.
Already paying? Use your existing account
You do not need a new account for every property or role. Switch to the property account you own, then open Account → Settings and enable Landlord, Tenant-company books, or both. Add your owned properties and rented properties there under the existing subscription and its limits. This does not start another trial. Currency stays fixed; enabling a workspace here does not offer a switch to disable it later.
Choose how your new account is billed
Choose Create another account from the user menu or account chooser. Select a property account, name it and enable owned properties, rented properties, or both. If you already own an eligible paid account, its subscription is selected by default: confirm both accounts belong to the same business and use the same currency. The new account shares paid access immediately after setup. Choose an independent trial for a separate business; it needs its own plan after 30 days. Your login and free tenant access stay the same. Creating an account does not charge you.
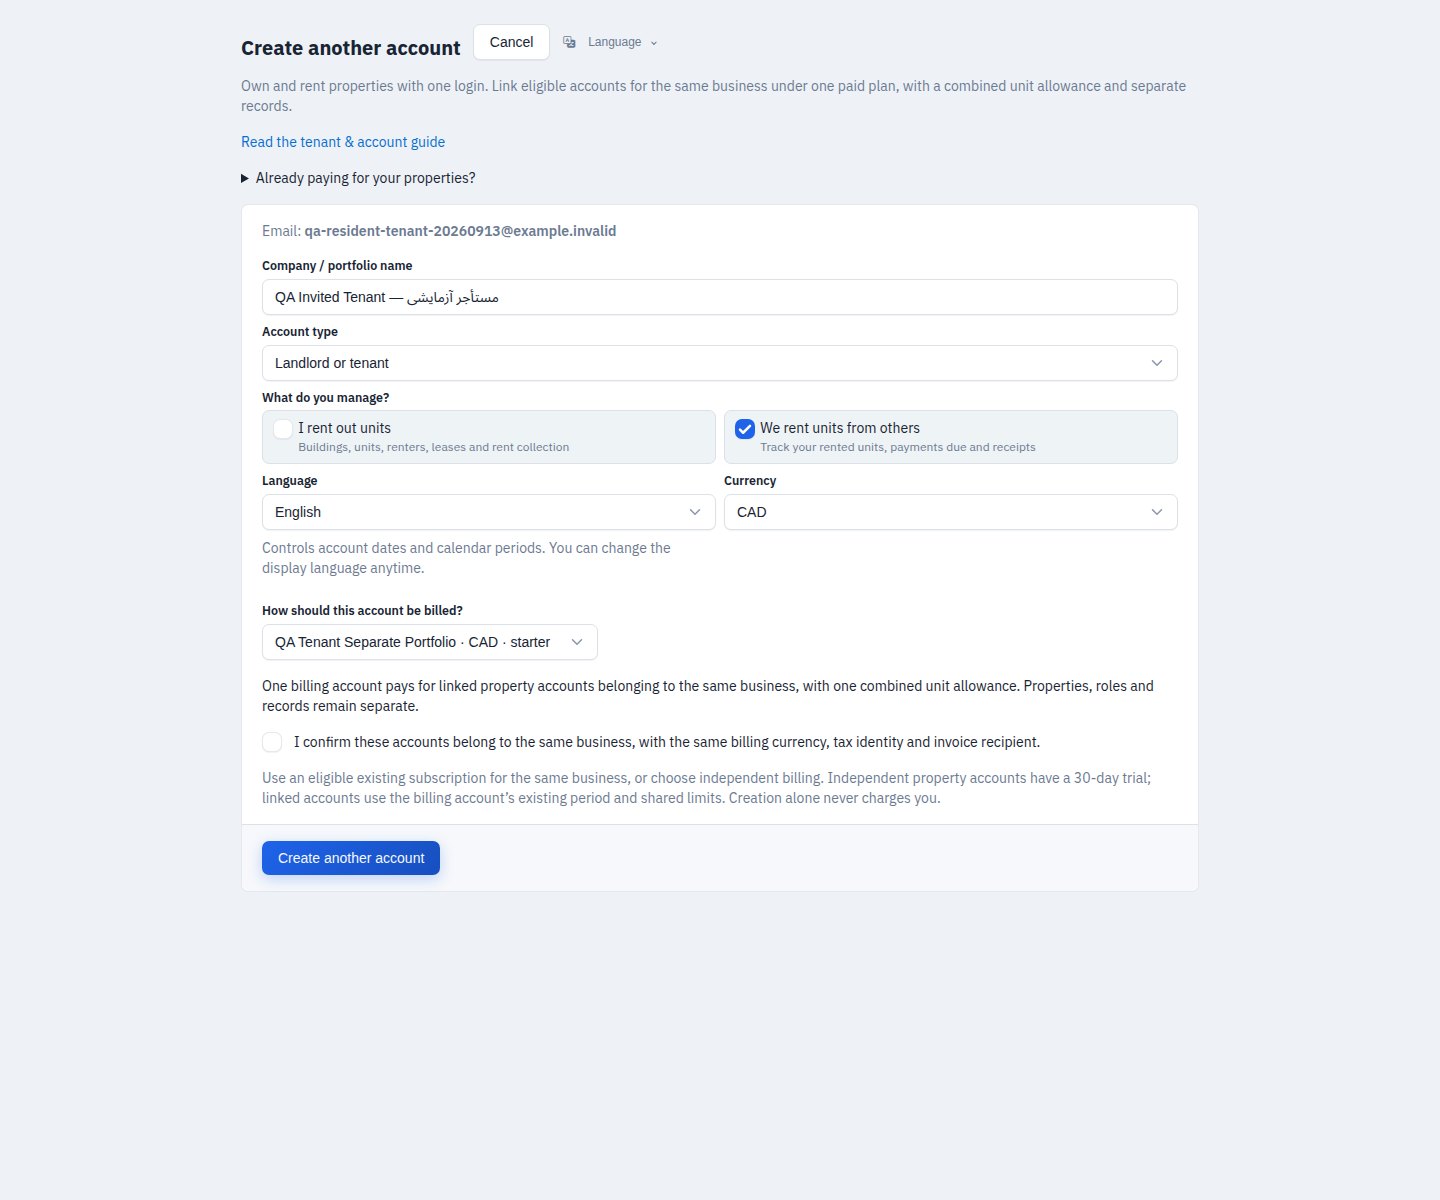
Switch without losing tenant access
Use the account chooser to open the workspace you need. Your role can differ in each account: tenant in your landlord’s, owner in your own. Check the active account before entering records or choosing a plan. Your own account does not copy the landlord’s leases or payment history. Creating it leaves your invited tenant membership in place.
Conversations, community and parking
Use your building’s conversations for direct contact with management or groups of eligible residents in that building. New messages show unread badges. The community board supports resident posts and parking advertisements. Management must approve an advertisement before other tenants can see it and contact its author. Arrange parking terms and payment directly; the board does not collect parking rent.
Pay for a plan without a card
In an account you own, open Subscription → Manual payments when that method is enabled. Follow the displayed payment instructions and submit the amount and reference. Upload a JPEG, PNG or PDF receipt up to 5 MB; PDFs must be unencrypted and 1–50 pages. Admin review approves or rejects the request and confirms any subscription extension. A missing receipt may be waived at the admin’s discretion. This pays for BuildingHQ, not rent to your landlord.
If something is missing
No unit or building? Check the selected account and ask the landlord to confirm the invitation email and active lease. No invitation? Check spam and ask for a resend. If the landlord’s account is unavailable, ask them to restore it; do not buy their plan yourself. For login trouble use Forgot password. Change your password from Account → Security; it applies to your login across accounts. Contact support if you need help deciding which account to use.